Summer is the ultimate season for memory making, but it also comes with a familiar challenge for parents: filling those long, hot afternoons with activities that don’t involve a screen. Crafting is the perfect antidote to the I’m bored chorus, but no one wants to spend their sunny days hunting down obscure supplies or scrubbing hot glue off the kitchen table.
The best summer crafts are low-stress, high-fun, and use everyday items you probably already have in your recycling bin or pantry. Long, sunny days, park trips, and… the inevitable afternoon slump where everyone is a little too hot and a lot too restless. We’ve all been there. When the initial excitement of summer break gives way to the “I’m bored” choruses, you don’t need a massive budget or a degree in fine arts to save the day.
The secret to successful summer crafting with kids especially energetic toddlers and young children is keeping it simple, sensory, and stress-free. In this post, we’ve rounded up our favorite low-mess, high-fun summer crafts that use everyday household items like paper plates, backyard sticks, and leftover cardboard. These activities are designed to spark their creativity, practice fine motor skills, and buy you enough time to actually finish a cup of coffee while it’s still hot. Let’s dive in.
Activity 1: Nature Paintbrushes
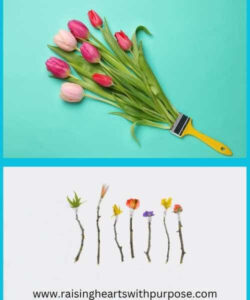
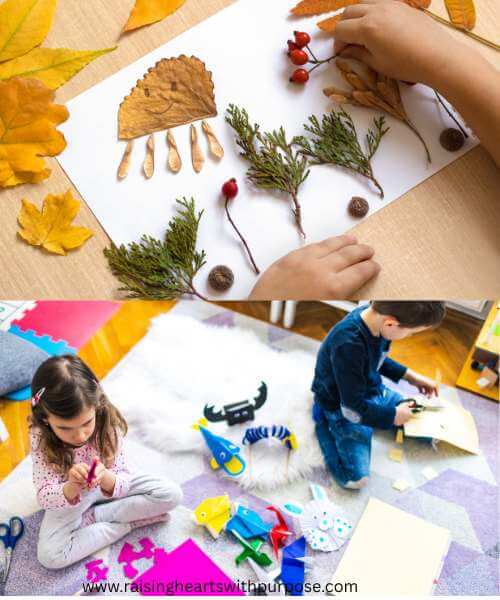
If you are looking for an activity that stretches across an entire morning, nature paintbrushes are the ultimate two-for-one deal. Part backyard scavenger hunt, part sensory art project, this craft gets kids outdoors, moving, and looking at nature through a creative lens.
Instead of hand-painted perfection, the joy of this craft is in exploration. Different leaves, pine needles, and ferns create wildly unique textures on paper that standard plastic brushes just can’t replicate. It’s an open-ended, process-art activity, meaning the experience of making it is the real masterpiece.
The Developmental Benefits (The Secret Perks)
While the kids just think they’re having messy fun, they are actually working on several crucial developmental skills:
-
Fine Motor Strength: Foraging for small items and helping wrap rubber bands builds hand strength and finger dexterity.
-
Sensory Awareness: Feeling the prickle of pine needles, the smoothness of a leaf, and the roughness of bark is wonderful tactile stimulation.
-
Scientific Inquiry: Kids learn to predict and observe how different shapes and textures leave different prints behind.
Supply List
You don’t need a trip to the craft store for this one, most of these supplies are waiting just outside your back door.
-
Sturdy Sticks: Look for sticks about 6 to 8 inches long and relatively straight to act as the paintbrush handles.
-
Nature Elements: Pine needles, ferns, broad leaves, long grass, flower heads, or rosemary sprigs.
-
Rubber Bands or Twine: To secure the nature elements to the sticks. (Small hair elastics work great for tiny hands).
-
Washable Paint: Standard kids’ tempera or washable paint works best.
-
Painting Surface: Large butcher paper, easel paper, or even flat pieces of leftover cardboard.
Step-by-Step Instructions
Step 1: The Backyard Scavenger Hunt Start by giving your child a small bucket or basket and heading outside. Challenge them to find textures. Look for items that might make a cool pattern. Collect a handful of sturdy sticks for handles, and then gather various bristles, think stiff pine needles, bushy ferns, floppy large leaves, and textured flowers.
Step 2: Build Your Brushes Gather your findings at an outdoor table or on the grass. Help your child bunch a nature element (like a small cluster of pine needles) around the tip of a stick. Wrap a rubber band tightly around the base to secure it. Repeat this process with different materials so you have a whole set of unique, custom paintbrushes.
Step 3: Set Up the Paint Station Squirt a few bright summer colors of washable paint onto a paper plate or a tray. Tape down a large piece of paper or cardboard to the grass or an outdoor table to keep it from blowing away.
Step 4: Experiment and Paint: Let your child dip their nature brushes into the paint and test them out. Encourage them to try different techniques:
-
Stamp with the flower heads to make polka dots.
-
Drag the pine needles to make streaks and lines.
-
Slap the broad leaves to see the vein patterns left in the paint.
Pro-Tips for Parents
-
Take it Outside: This is definitely a backyard craft. Doing this on the grass means you can simply hose down any paint spills, keeping your kitchen entirely stress-free.
-
The Toddler Modification: If you have a younger toddler who lacks the frustration tolerance or grip to hold a stick brush, skip the stick entirely! Let them dip a large, sturdy leaf or a whole pinecone directly into the paint using their hands.
-
Keep the Handles: When the painting is done, chop off the messy nature bristles, save the sticks in a bin, and you’re already prepped for the next time you need stick handles
- Clothes: On such days, let the children wears not so bright clothes or clothes that can easily be washed incase of stain.
Activity 2: Sun-Catcher Nature Frames
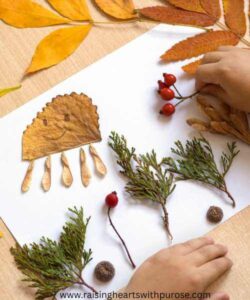
There is something magical about the way summer sunlight streams through a window, and this activity captures that magic perfectly. Sun-Catcher Nature Frames turn a simple neighborhood walk into a treasure hunt for vibrant colors and delicate shapes.
Unlike traditional sun-catchers that use tissue paper, this version relies entirely on the natural beauty of real flower petals and leaves. It is a brilliant way to display the fleeting colors of summer, and because it uses clear contact paper, there is absolutely no messy glue involved. Once finished, they hang beautifully in a sunny kitchen window, casting colorful, natural shadows into your home.
The Developmental Benefits (The Secret Perks)
While your little artists are focused on picking the prettiest petals, this craft is quietly supporting their growth:
-
Visual Discrimination & Spatial Awareness: Deciding where to place each leaf and petal to fit inside the frame helps children understand spacing and scale.
-
Pincer Grasp Development: Picking up delicate, thin flower petals and pressing them onto the sticky paper is phenomenal practice for the small muscles in a child’s fingers.
-
Appreciation for Nature: It encourages kids to slow down and observe the intricate details, veins, and varying shades of the plants around them.
Supply List
This project breathes new life into your recycling bin. Here is what you’ll need:
-
Sturdy Cardboard: Cardboard from a shipping box works best, but cereal boxes or heavy cardstock will also do.
-
Clear Contact Paper: This is the magic ingredient. You can find rolls of clear self-adhesive laminating sheets at most dollar stores or craft aisles.
-
Flat Nature Finds: Bright flower petals (clover, dandelions, marigolds, or dropped blossoms), flat green leaves, ferns, and clover. Tip: Thinner, flatter items stick much better than bulky whole flowers.
-
Scissors or a Craft Knife: (For adult use only) to cut out the frames.
-
Tape or Twine: To hang the finished frame in the window.
Step-by-Step Instructions
Step 1: Prep the Frames (Adult Step) Before inviting the kids over, cut out your cardboard frames. Cut the cardboard into a square or rectangle (roughly 6×6 inches or 5×7 inches). Then, cut out the center to create a window frame about 1 inch wide.
Step 2: Collect the Colors Head outside for a color walk. Equip your child with a small container and encourage them to look for a variety of colors and shapes. Hunt for bright yellow dandelions, pink petals, vibrant green clover, and delicate ferns. Remind them to look for pieces that are relatively flat.
Step 3: Add the Sticky Background Cut a piece of clear contact paper slightly larger than the opening of your frame. Peel off the backing and press it firmly onto the back of your cardboard frame, so the sticky side faces up through the window opening.
Step 4: Design the Sun-Catcher Now it’s time to create. Let your child press their collected leaves and petals directly onto the sticky surface inside the frame. They can create a neat pattern, a mosaic design, or just a beautiful, colorful collage. Encourage them to fill as much of the sticky space as possible.
Step 5: Seal and Display Once they are happy with their design, cut a second piece of clear contact paper. Carefully lay it over the back of the petals, sandwiching the nature finds between the two sticky layers. Smooth it down with your fingers to press out any air bubbles. Tape the frame directly to a sunny window, or punch a hole in the top and loop some twine through to hang it!
Pro-Tips for Parents
-
The No-Pick Rule: Teach kids to look for petals and leaves that have already fallen to the ground, or establish which garden bushes are okay to pick from before you start. It’s a great lesson in respecting the garden and keeping boundaries.
-
The Toddler Modification: If cutting out frames feels like too much prep work with an impatient toddler running around, skip the cardboard entirely. Tape a single large sheet of contact paper directly to a glass door or window, sticky-side facing out. Let your toddler press leaves and petals directly onto the window. When they are done, seal it with a second sheet.
-
Dealing with Wilting: Because these use real, organic materials, the petals will naturally fade and dry out over a few weeks. Embrace the changing colors as a mini-science lesson for the kids on how plants change over time.
Activity 3: Ice Block Treasure Hunt

When the summer heat hits its peak and the backyard feels a little too warm, this Ice Block Treasure Hunt is the ultimate secret weapon. It is a brilliant, low-cost sensory activity that keeps kids deeply engaged, cool, and quiet for surprisingly long stretches of time.
The concept is simple: small plastic toys are frozen inside a giant block of ice, and your kids become mini-archaeologists tasked with chipping, melting, and excavating their fossils. It combines the thrill of a treasure hunt with the soothing, cooling nature of water play. Best of all? It costs next to nothing and uses toys you already own.
The Developmental Benefits (The Secret Perks)
While your kids are completely absorbed in rescuing their toys, they are building a fantastic set of skills:
-
Problem-Solving & Critical Thinking: Kids naturally experiment with cause and effect. They’ll quickly figure out that warm water melts ice faster than cold water, or that adding salt creates tiny cracks.
-
Persistence & Focus: This activity rewards patience. It teaches children to stick with a task over an extended period to achieve a rewarding goal.
-
Fine Motor Control: Using droppers, squeeze bottles, spray bottles, and spoons to target specific spots on the ice builds precision, grip strength, and hand-eye coordination.
Supply List
You can customize this entirely based on what you have in your freezer and toy box.
-
A Large Plastic Container: A plastic Tupperware container, a silicone loaf pan, or an empty clean milk carton works perfectly.
-
Small Plastic Toys: Plastic dinosaurs, toy cars, plastic rings, coins, glass gems, or faux jewels. Tip: Avoid anything with batteries, fabric, or stickers that water could ruin.
-
Excavation Tools: Large spoons, spray bottles, squeeze bottles, squirt guns, paintbrushes, or medicine droppers.
-
Melting Accelerators: Warm water (in a bowl or squeeze bottle) and a small cup of coarse salt.
-
A Large Tray or Shallow Bin: To contain the melting ice if you are doing this on a patio or porch.
Step-by-Step Instructions
Step 1: The Layered Freeze (The Secret to Success)
If you drop all the toys into a container of water at once, they will either all sink to the bottom or float to the top. To create a true challenge, freeze it in layers. Fill your container about one-third of the way with water, drop in a few toys, and freeze it for a couple of hours. Add a second layer of water and toys, freeze again, and finish with a final layer.
Step 2: Unmold the Treasure Block
When you are ready to play, run the bottom of the plastic container under warm water for 30 seconds. The giant ice block should slip right out! Place the ice block inside a large shallow storage bin, a water table, or directly onto the backyard grass.
Step 3: Equip Your Archaeologists
Set up an excavation kit for your kids. Fill squeeze bottles or bowls with warm water, hand them some chunky spoons for scraping, and give them a small cup of salt.
Step 4: Let the Excavation Begin
Challenge your kids to free the trapped treasures. Show them how sprinkling a little salt onto the ice makes a satisfying crackling sound and creates tiny tunnels, or how a dropper of warm water can melt a hole straight down to a trapped dinosaur.
Pro-Tips for Parents
-
Plan Ahead: Because of the layering process, this craft requires a bit of foresight. Try prepping two or three of these on a Sunday night so you have a stash of ice blocks ready to pull out of the freezer on a high-temperature Wednesday afternoon.
-
The Toddler Modification: For younger toddlers, safety is key. Skip the salt (which can irritate tiny cuts or eyes) and skip any sharp scraping tools. Instead, give them chunky paintbrushes, safe kitchen whisks, and a spray bottle filled with warm water. Spraying the bottle is incredible for toddler hand strength.
-
Color It Up: To add an extra layer of sensory fun, add a drop or two of food coloring to each layer of water before freezing. As the block melts, the colors will swirl together, creating a beautiful, messy sensory experience.
Activity 4: Puffy Sidewalk Paint
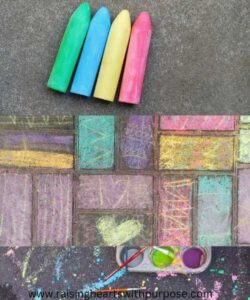
Sidewalk chalk is a classic summer staple, but if you want to take your driveway art to the next level, Puffy Sidewalk Paint is the answer. This brilliant recipe transforms standard outdoor painting into a vibrant, 3D sensory experience.
Made with simple kitchen ingredients, this paint goes on smoothly like liquid velvet, but as it dries under the hot summer sun, it puffs up into a cool, chalky, textured masterpiece. It is the perfect way to revitalize an ordinary afternoon, giving kids a brand-new way to paint on a giant canvas: the driveway or sidewalk. Best of all, it washes away completely with the garden hose or the next rainstorm.
The Developmental Benefits (The Secret Perks)
While your driveway gets a colorful makeover, your kids are hitting several developmental milestones:
-
Gross Motor Development: Painting on a large scale outdoors encourages kids to stretch, squat, kneel, and use large arm movements, which strengthens their core and shoulder muscles.
-
Sensory Exploration: The transition of the paint from a smooth, cold liquid to a rough, puffy solid provides a wonderful tactile contrast for curious minds.
-
Color Theory & Creativity: Mixing different colors directly on the pavement allows kids to see firsthand how secondary colors are formed.
Supply List
You likely already have all the ingredients for this budget-friendly recipe sitting in your pantry.
-
Flour: 1 cup (acts as the base and gives the paint its puffy structure).
-
Cornstarch: 1 cup (helps the paint dry into a smooth, chalky texture).
-
Water: 1 to 1.5 cups (adjust to get a thick, pourable consistency).
-
Dish Soap: 1 tablespoon (the secret ingredient that makes it super easy to wash off the concrete later).
-
Washable Food Coloring or Liquid Watercolors: To create bright, summer shades.
-
Squeeze Bottles or Muffin Tins: Clean, empty condiment bottles work beautifully for squeezing designs, or you can use a muffin tin paired with chunky paintbrushes.
Step-by-Step Instructions
Step 1: Whip Up the Base
In a large mixing bowl, combine 1 cup of flour and 1 cup of cornstarch. Whisk in 1 cup of water and 1 tablespoon of dish soap. Stir vigorously until the mixture is smooth and completely free of lumps. The consistency should mimic thick pancake batter pourable, but not completely runny. If it feels too thick to squeeze, add a splash more water.
Step 2: Add the Summer Colors
Divide the white base into your squeeze bottles or the compartments of a muffin tin. Add several drops of food coloring or liquid watercolors to each container and stir well. Encourage your kids to help mix up bright neon shades, ocean blues, or sunshine yellows.
Step 3: Head to the Driveway Canvas
Find a flat, clear patch of sidewalk or driveway preferably in a sunny spot, as the sun speeds up the drying and puffing process. Hand over the squeeze bottles or brushes and let them create.
Step 4: Watch it Transform
Kids can squeeze out thick lines to make 3D rainbows, write their names, or paint giant flowers. As the sun bakes the paint, the water evaporates, leaving behind a raised, vibrant, chalky design that kids love to touch once it’s dry.
Pro-Tips for Parents
-
The Easy Cleanup Guarantee: Don’t stress about the food coloring staining your concrete. Thanks to the tablespoon of dish soap mixed into the base, the pigment won’t bind to the pavement. When playtime is over, a quick blast with the garden hose will wash it all away instantly.
-
The Toddler Modification: Squeeze bottles can sometimes frustrate younger toddlers whose hand grip isn’t quite strong enough yet. For the under-3 crowd, skip the bottles. Pour the paint into a muffin tin, hand them a chunky foam brush or a clean kitchen pastry brush, and let them paint with big, sweeping motions.
-
Use it Fresh: Because this recipe contains real flour, it doesn’t keep well inside a sealed bottle for more than a day or two (it will start to ferment and expand). Only mix up what you plan to use for that afternoon’s painting session.
Activity 5: Paper Plate Sunflowers
When the afternoon heat gets a bit too intense or a sudden summer thunderstorm rolls in, it’s time to move the fun indoors. Paper Plate Sunflowers are a bright, cheerful classic that instantly brings the warmth of the summer garden right onto your kitchen table.
This craft is an absolute staple for a reason: it’s incredibly budget-friendly, high-contrast, and can be easily adapted for kids of all ages. Instead of aiming for a flawless, store-bought look, this activity celebrates the beautiful, mismatched charm of kid-made art. The combination of painting, tearing, and pasting makes it an engaging multi-step project that keeps little hands happily occupied.
The Developmental Benefits (The Secret Perks)
While your kitchen table transforms into a sunny field of yellow, your child is working on a powerhouse of foundational skills:
-
Bilateral Coordination: Tearing tissue paper requires kids to use both hands together, with one hand moving forward and the other moving backward, a crucial skill for future tasks like buttoning shirts or cutting food.
-
Fine Motor Precision: Picking up small real sunflower seeds or tiny paper squares and placing them precisely into the glued center strengthens the grasp needed for holding pencils.
-
Sensory and Texture Contrast: Feeling the smooth paper plate, the crinkly tissue paper, and the bumpy, ridged seeds provides a rich tactile experience.
Supply List
You likely have all of these basic crafting supplies tucked away in your closet already.
-
Paper Plates: Standard, inexpensive white paper plates (the cheap, thin ones work best because they are easy for kids to cut or bend).
-
Yellow Paint: Washable tempera paint or acrylic paint, along with a chunky paintbrush.
-
Yellow and Orange Tissue Paper: Cut or torn into small, 1-inch squares.
-
Real Sunflower Seeds or Black/Brown Buttons: For the textured center. (If you don’t have these, black or brown construction paper works perfectly too).
-
School Glue: Standard liquid school glue or a sturdy glue stick.
-
Scissors: Kid’s safety scissors if they are practicing cutting.
Step-by-Step Instructions
Step 1: Paint the Sunshine Base Start by flipping the paper plate upside down so the curved bottom faces up. Have your child paint the entire rim of the plate bright yellow. Set it aside for a few minutes to dry (this is a great time to wash hands and prep the next step).
Step 2: Tear and Prep the Petals While the paint is drying, give your child sheets of yellow and orange tissue paper. Let them rip and tear the paper into small, bite-sized squares. Ripping paper is strangely therapeutic for kids and is fantastic for their finger strength.
Step 3: Create the Petal Fringe (Adult or Big Kid Step) Once the paint is dry, use scissors to cut small slits all the way around the rim of the paper plate, stopping where the flat center circle begins. This creates a fringed effect. Show your child how they can gently bend and crinkle these tabs forward to look like real, layered flower petals.
Step 4: Layer the Tissue Paper Have your child apply glue all over the yellow rim of the plate. Let them press their torn tissue paper squares onto the fringe. Mixing the yellow and orange tissue paper gives the sunflower a beautiful, realistic depth.
Step 5: Fill the Center Squeeze a generous amount of liquid glue into the center circle of the paper plate. Let your child pour or place the real sunflower seeds (or black buttons/paper scraps) into the glue until the center is completely filled. Press down gently to ensure everything sticks, let it dry completely, and shake off any loose pieces!
Pro-Tips for Parents
-
Managing the Seed Mess: If you are using real sunflower seeds for the center, contain the inevitable runaway seeds by placing the paper plate inside a shallow baking sheet or a plastic tray before your child starts pouring them on.
-
The Toddler Modification: If safety scissors and liquid glue feel too advanced for a young toddler, simplify the project! Skip the fringed cuts entirely. Instead, wrap a piece of double-sided tape or contact paper over the center of a pre-painted yellow plate. Let your toddler simply press large black pom-poms or construction paper circles onto the sticky center.
-
Make it a Garden Display: Punch a small hole in the top of the plate and thread a green pipe cleaner or ribbon through it. You can hang a row of these in a playroom window to create your very own indoor summer garden.
Activity 6: Cardboard Tube Binoculars
Before you toss those empty toilet paper rolls or paper towel tubes into the recycling bin, save them. They are the ticket to an entire morning of imaginative play. Cardboard Tube Binoculars are a classic childhood craft that bridges the gap between crafting time and pretend play.
The brilliance of this project is that the fun doesn’t end when the glue dries. Once these binoculars are assembled, they instantly transform your backyard, living room, or neighborhood park into an adventurous safari zone. It’s a wonderful way to encourage kids to see their everyday surroundings in a completely new, focused way.
The Developmental Benefits (The Secret Perks)
While your little explorers are busy decorating their new gear, they are working on several fantastic developmental milestones:
-
Imaginative & Creative Play: Stepping into the role of an explorer promotes storytelling, language development, and role-playing skills.
-
Hand-Eye Coordination: Wrapping yarn, aligning the tubes, and carefully placing stickers or drawing patterns requires precise control and focus.
-
Focus and Observation: Looking through the tubes forces children to isolate their vision, helping them practice focusing on specific objects in their environment.
Supply List
This craft relies entirely on everyday household items, making it perfect for a spontaneous crafting session:
-
Cardboard Tubes: 2 toilet paper rolls (or 1 paper towel roll cut completely in half).
-
Connecting Adhesive: Heavy-duty tape (like masking tape or duct tape) or a hot glue gun (for adult use).
-
Decorating Supplies: Stickers, markers, crayons, colored masking tape, or construction paper.
-
Yarn or Twine: About 2 feet of string to create the neck strap.
-
Hole Punch: To attach the neck strap securely.
Step-by-Step Instructions
Step 1: Decorate the Tubes It is much easier for kids to decorate the cardboard tubes before they are fastened together. Lay the two tubes flat on the table. Let your child go to town personalizing them! They can wrap them in colored construction paper, color them with bright markers, or cover them completely in fun stickers.
Step 2: Connect the Tubes (Adult Step) Place the two decorated tubes side-by-side so they are perfectly aligned. Secure them together by wrapping a piece of tape around both the front and back ends of the tubes. If you want a more seamless look, a line of hot glue run right down the middle where the tubes meet works beautifully and holds up to rugged play.
Step 3: Punch the Strap Holes Using a hole punch, poke one hole on the outside edge of the left tube, and another hole on the outside edge of the right tube (near the end your child will look into).
Step 4: Attach the Neck Strap Thread your yarn or twine through the holes and tie a secure knot on each side. Safety tip: Make sure the string is long enough to easily slip over your child’s head, but short enough that it won’t get caught on things while they run.
Step 5: Go on a Backyard Safari Hand over the binoculars and launch the adventure. You can give them a quick checklist of things to hunt for through their lenses: Can you spot a flying bird? A shiny rock? A triangular leaf?
Pro-Tips for Parents
-
The Secret Center Spacer: If your child puts the binoculars up to their eyes and complains that they can’t see properly, the tubes might be a bit too close together for their face shape. To fix this, place a small wooden craft stick, a row of buttons, or a folded piece of cardboard between the two tubes before taping them together. This adds just enough space to align perfectly with little eyes.
-
The Toddler Modification: If you have a younger toddler who gets frustrated trying to look through two tubes at once, make a Spy Telescope instead. Use a single paper towel roll. It requires half the assembly time, zero frustration balancing the eyes, and is just as magical for backyard exploration.
-
Pair it with a Scavenger Hunt: To extend the life of this activity, draw a super simple visual checklist on a piece of paper (a stick figure bug, a sun, a tree, a flower). Send them out into the yard with their binoculars and a crayon to check off each item as they discover it
- Quick Tips for Stress-Free Crafting with Littles
Let’s be completely honest: the idea of crafting with kids is often a lot more peaceful than the reality. It doesn’t take much for a relaxing afternoon project to dissolve into a sea of spilled paint, sticky fingers, and a stressed-out parent.
But it doesn’t have to be that way. The secret to successful crafting with toddlers and young children lies entirely in the setup. Here are a few battle-tested tips to keep the experience fun, calm, and completely stress-free for everyone involved:
-
Embrace Process Over Product: As adults, we tend to focus on the end result. We want the sunflower to look like a sunflower. Kids, however, are entirely focused on the process. If your toddler wants to paint their paper plate entirely brown or stick all the sunflower seeds in one giant clump, let them. The goal is sensory exploration and confidence-building, not a Pinterest-perfect replica.
-
Take it Outside: Whenever a craft involves liquid glue, paint, or water, make the backyard your studio. Dealing with spills is infinitely easier when you can simply rinse the patio or the grass down with a garden hose. Plus, nature provides the absolute best backdrop for creative inspiration.
-
Prep the Supplies Beforehand: Kids have notoriously short attention spans. If they have to sit and wait for fifteen minutes while you hunt down scissors, cut cardboard, and untangle yarn, they will lose interest before the craft even begins. Do all the adult prep work, like cutting frames or gathering rubber bands, before you invite them to the table.
-
Keep a Wet Washcloth Nearby: Don’t wait until the end of the craft to clean up. Keep a damp rag or a pack of baby wipes right next to the crafting station. Quickly wiping off sticky fingers mid-project can prevent a toddler meltdown (and save your walls from colorful handprints).
The Bottom Line
At the end of the day, summer break isn’t about filling every single second with elaborate, expensive excursions. The days that kids remember most are often the ones spent slowed down, sitting together on the shaded porch, making something entirely out of their own imagination.
These simple crafts are your secret weapon for those long afternoon stretches. They give your kids a screen-free outlet for their endless energy, let them practice essential fine motor skills, and most importantly buy you a little bit of breathing room to enjoy your own iced coffee while it’s actually cold.
So, grab those empty cardboard tubes, head out into the yard for a few sticks, and let the summer crafting begin.