25 Easy Christmas Hairstyles for Toddler Girls That Take 5 Minutes or Less
There is something truly magical about the holiday season with a toddler. Between picking out matching Christmas pajamas, taking annual family portraits, and bringing them to festive holiday parties, seeing the holidays through their bright eyes makes every moment special. But let’s be honest: while getting them dressed up in velvet dresses and glittery shoes is picture-perfect, actually getting a toddler to sit still long enough to brush and style their hair is a whole different story.
If the thought of wrestling a squirming two-year-old with a hairbrush while a curling iron warms up sounds like a recipe for a holiday meltdown, you are not alone. My niece will give you different sitting positions in just a minute.
The good news? Beautiful holiday hair doesn’t have to mean complicated braids or an endless battle in front of the mirror.
In this post, we’ve rounded up 25 cute, quick, and fuss-free Christmas hairstyles for toddler girls. These adorable looks look like you spent hours at a salon, but in reality, they take just 5 minutes or less to pull off. Whether your little one has super fine wisps, bouncy curls, or a thick mane, you’ll find the perfect festive style to complete her holiday look.
The Secret to Stress-Free Toddler Holiday Hair

Before we dive into the styles, here are three golden rules every toddler parent needs in their holiday hair arsenal:
-
Prep with Detangler & Spray Water: Trying to style dry toddler hair is a fast track to pulls, tears, and flyaways. A quick mist of water or a child-safe leave-in detangling spray makes hair instantly manageable and smooths down static.
-
Invest in Snag-Free Silicone Elastics: Avoid traditional rubber bands that pull delicate baby hair. Opt for clear or festive red-and-green clear silicone elastics, and keep a pair of mini safety cutter tools handy for easy, painless removal at night.
-
Master the Art of Distraction: The best hair tool isn’t a brush, it’s a high-value distraction. Hand them a festive snack like a gingerbread cookie, play their favorite holiday movie, or let them play with a special holiday hair accessory kit while you work your magic.

Ready to find the ultimate holiday hairstyle for your little girl? Let’s get into the list.
Category 1: Quick & Cute Under 5 Minutes
Perfect for busy mornings, school holiday events, or when you need to jump out the door for last-minute Christmas errands.
When you’re running low on time, you don’t need intricate techniques to make your toddler look picture-perfect. These five simple styles rely on smart sectioning, fun accessories, and quick tricks to deliver maximum festive impact with minimal effort.
1. The Classic Red Bow Ponytail
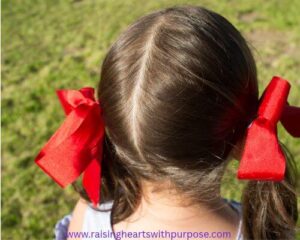
Best For: All hair types and lengths chin-length or longer.
Time Required: 2 minutes
Nothing says classic holiday charm quite like a crisp pony topped off with an oversized velvet bow. This go-to style works on fine, thick, straight, or curly hair, making it the ultimate lazy-day secret weapon.
-
How to Style It:
-
Lightly spritz a detangling spray or water mist over your toddler’s hair and smooth it brushed back toward the crown of her head.
-
Secure the hair in a mid-to-high ponytail using a sturdy, snag-free elastic.
-
Take an oversized red or forest-green velvet ribbon bow, alligator clips or elastic tie-backs work best for toddler hair and attach it directly over the hair tie to conceal it. Tip: If your toddler has very fine or slippery hair, lightly tease the ponytail hair slightly or mist it with a tiny bit of toddler-friendly texture spray so the bow clip doesn’t slide down throughout the day.
-
2. Double Bubble Braids
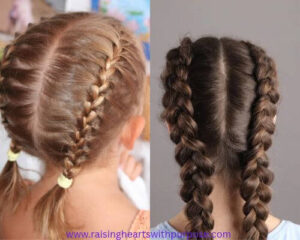
Best For: Medium to long hair
Time Required: 4 minutes
If classic pigtails tend to slip out or get messy after ten minutes of play, bubble braids are your savior. They look super stylish, keep hair securely away from her face, and hold up exceptionally well through active holiday playdates.
-
How to Style It:
-
Part your toddler’s hair straight down the middle to create two equal sections.
-
Gather one side into a high pigtail and secure it with a colorful or clear mini elastic.
-
Moving down the length of the pigtail about 1–2 inches, place a second mini elastic.
-
Gently pull at the edges of the hair between the two elastics with your fingers to “fluff” or “puff” it outward into a round bubble shape.
-
Repeat the process down the length of the pigtail, then replicate on the other side using festive red and green elastics!
-
-
Tip: Use alternating red, white, and green elastics for a sweet candy cane pattern down the bubbles.
3. The Half-Up Holiday Crown
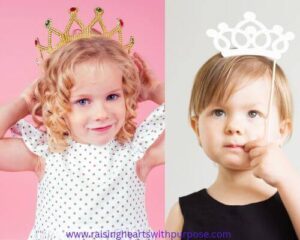
Best For: Short hair, bobs, or shoulder-length hair
Time Required: 3 minutes
Got a toddler with a cute short bob or stubborn bangs that keep falling into her eyes? The Half-Up Holiday Crown keeps her hair out of her face while letting the rest of her natural length shine through.
-
How to Style It:
-
Using your fingers or a comb, trace a horizontal line starting right above each ear, gathering the top half section of her hair.
-
Pull this top section back toward the upper crown and secure it with a soft elastic.
-
Clip 2–3 mini holiday-themed snaps or jaw clips like mini snowflakes, candy canes, or glittery trees along the pulled-back crown section to frame her face like a festive tiara.
-
-
Tip: Leave a couple of soft, loose tendrils or bangs out at the front to frame her face for an effortlessly adorable look.
4. Topsy-Tail Twist Pigtails
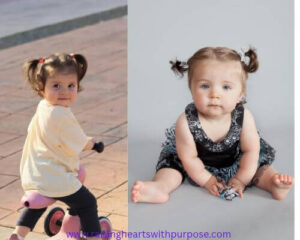
Best For: Shoulder-length to long hair
Time Required: 4 minutes
Remember the 90s topsy-tail craze? It’s back, and it’s one of the easiest ways to transform basic, plain pigtails into something that looks like an elaborate salon twist without using any actual braiding skills.
-
How to Style It:
-
Divide the hair down the middle into two low pigtails behind the ears and secure each with an elastic, leaving them slightly loose against the head.
-
Using your index finger, split the hair above the elastic into two equal halves, creating a small tunnel hole.
-
Flip the bottom tail of the pigtail UP and thread it through the hole from top to bottom or bottom to top.
-
Gently pull the tail down to tighten the twist. Repeat on the other side.
-
-
Tip: Finish by wrapping a metallic gold or glitter scrunchie around the base of each twist for an added layer of sparkle.
5. The Side-Swept Mini Braid

Best For: Any length with bangs or front layers
Time Required: 3 minutes
If you’re rushing out the door and don’t have time for a full hairstyle, a single side-swept accent braid takes less than three minutes and adds an instant touch of elegance.
-
How to Style It:
-
Create a deep side part on your toddler’s preferred side.
-
Take a small 1-inch section of hair from the heavier side near the front hairline.
-
Do a simple, relaxed three-strand braid moving downward and toward the back of her ear.
-
Fasten the end of the braid with a mini clear elastic, then secure the braid flat against the side of her head with a sparkling star or holly-shaped clip.
-
-
Tip: If your toddler has slippery or straight hair, spray a tiny bit of water or light gel on the front section before braiding to keep stray flyaways from poking out.
Category 2: Festive & Themed Holiday Magic
Styles featuring Christmas accessories, colors, and holiday motifs that will bring pure holiday joy to your little one’s look.
If you want to bring the spirit of the season front and center, these themed hairstyles are sure to get compliments at every holiday gathering, Christmas parade, or preschool pageant. Using clever accessories, ribbons, and styling tricks, these five looks turn your toddler’s hair into a festive work of art.
6. The Reindeer Antler Buns
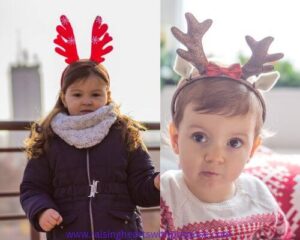
Best For: Medium to long hair.
Time Required: 5–7 minutes.
Turn your toddler into Santa’s favorite little helper with these ultra-cute double buns. This playful look doubles down on the holiday fun by framing tiny top knots with festive antlers.
-
How to Style It:
-
Part her hair down the center into two equal sections.
-
Twist each side into a high pigtail, then wrap the hair into a neat donut bun or messy top knot on top of her head. Secure firmly with elastics or bobby pins.
-
The DIY Pipe Cleaner Trick: Bend two brown or sparkly gold pipe cleaners into small antler shapes. Gently tuck the bottom ends into the base of each bun or loop them around the hair tie.
-
Alternatively, pop on a plush reindeer antler headband right behind the buns. Add a little clip-on red pom-pom to the side for Rudolph’s famous nose.
-
-
Tip: If using pipe cleaners, fold the very ends over into small smooth loops so there are no sharp wire tips touching her scalp.
7. Candy Cane Twist

Best For: All hair types, shoulder-length or longer.
Time Required: 5 minutes
Weaving festive ribbons into simple hair twists gives the instant look of a peppermint stick. It’s colorful, eye-catching, and much easier to pull off than a complex multi-strand ribbon braid.
-
How to Style It:
-
Divide the hair into two low or mid-height pigtails.
-
Take a length of thin red ribbon and a length of white/green ribbon about twice the length of her hair. Tie both around the base elastic of one pigtail.
-
Split the hair in the pigtail into two strands. Combine a ribbon with each strand of hair.
-
Twist the two sections around each other tightly down to the ends, letting the red and white ribbons cross over to create that iconic striped candy cane effect.
-
Secure the end with a mini clear elastic and trim any excess ribbon. Repeat on the other side.
-
-
Tip: Choose satin or grosgrain ribbons so they don’t fray while twisting, and seal the cut ribbon ends with a tiny dab of clear craft glue or nail polish.
8. Christmas Tree Pigtails
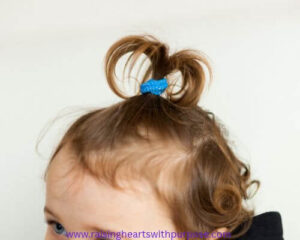
Best For: Medium to long hair
Time Required: 6 minutes
This is an absolute showstopper. By stacking elastics from narrow to wide, you can create a clever triangular shape down each side of the head that mimics a pine tree.
-
How to Style It:
-
Start with two small pigtails right at the top crown of her head using green elastics.
-
A few inches down, gather a new section of hair from the sides, join it with the first pigtail, and secure with a second elastic.
-
Repeat this process 3–4 times down the side of the head, gently widening the section of hair each time to create a triangular Christmas tree canopy shape.
-
Finish by placing a mini yellow star clip right at the top elastic of each side to serve as the tree topper.
-
-
Tip: Clip tiny colorful mini claw clips (like little ornaments) along the elastics down the tree for extra holiday magic.
9. Mistletoe Headband Halo

Best For: Short, medium, or curly hair.
Time Required: 3–5 minutes.
For an effortless look that feels straight out of a holiday postcard, pair natural curls or soft waves with a statement holly, mistletoe, or floral headband.
-
How to Style It:
-
Prep her natural hair with a light misting of leave-in conditioner or wave spray to enhance her natural curl or texture.
-
Gently comb or finger-fluff her hair to add soft volume.
-
Place a soft, stretchy fabric or flexible headband featuring artificial mistletoe berries, faux pine needles, or red holly flowers just behind her front hairline.
-
Pin back any short face-framing strands under the headband so her gorgeous face takes center stage.
-
-
Pro Tip: Look for headbands lined with soft velvet or satin so they stay comfortably in place without squeezing behind her ears.
10. Present Bow Half-Up
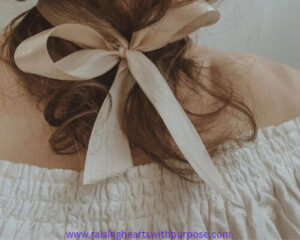
Best For: All hair lengths chin-length or longer
Time Required: 4 minutes
Make your little one look like the most precious gift under the tree. This style uses a structured, oversized gift-style bow placed right at the top of a half-up ponytail.
-
How to Style It:
-
Section off the top portion of her hair from temple to temple and pull it back into a sleek half-up ponytail at the top crown of her head.
-
Smooth out any bumps using a soft-bristle brush and a touch of water or styling cream.
-
Secure the ponytail with a mini elastic.
-
Clip a large, wide-looped gift bow in satin, plaid, or gold metallic directly over the elastic so it sits upright like a present topper.
-
-
Tip: If your toddler’s hair is very fine, make the half-up ponytail slightly higher on top of her head so the weight of the bow won’t cause the style to sag.
Category 3: Protective & Sleek For Curly or Textured Hair
Gentle, beautiful styles that keep natural curls hydrated, protected, and neat through every holiday celebration.
Holiday events often mean long days, cool air, and plenty of activity all of which can dry out delicate toddler curls and coils. These five protective and sleek styles are designed to seal in moisture, protect delicate edges, and hold up through endless holiday fun, all while showcasing gorgeous natural textures.
11. Sparkly Criss-Cross Partings

Best For: Short to medium curls, coils, and afro-textured hair
Time Required: 6–8 minutes
This eye-catching geometric style keeps hair neatly pulled away from the face while creating a fun, festive pattern across the crown.
-
How to Style It:
-
Start by misting the front section of hair with a water/leave-in conditioner mix and applying a gentle, kid-safe styling butter or edge cream.
-
Create 4 small, equal square sections across the front hairline from ear to ear. Secure each small section into a mini ponytail using metallic gold or festive red/green elastics.
-
Take the two middle mini ponytails, cross them over each other in an X shape, and join them with the outer sections behind them.
-
Secure the crossed sections into the rest of her loose curls or combine them into two low puff pigtails.
-
-
Tip: Always soak silicone elastics in a drop of coconut or jojoba oil before applying them to prevent hair breakage during wear and removal.
12. Festive Crown Braids
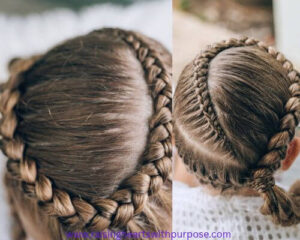
Best For: Medium to long textured hair
Time Required: 7–10 minutes
Regal, elegant, and completely tug-free when kept comfortably loose, this halo-like crown braid keeps ends tucked away safely while giving a nod to holiday elegance.
-
How to Style It:
-
Part the hair down the center or slightly off to one side into two equal halves.
-
Starting from the nape of the neck or side temple, create a flat twist or chunky cornrow sweeping upward and around the curve of her head toward the front.
-
As you braid or twist, thread a piece of soft, metallic gold string or embroidery floss through the strands for a subtle glitter effect.
-
Join the two braids at the top or back, tucking the ends under securely with a satin bobby pin or mini clip.
-
-
Pro Tip: Keep tension soft around the hairline and edges—toddler scalps are extra sensitive, and protective styles should never feel tight.
13. Puff Pigtails with Bows
Best For: Coily, kinky, or high-volume curly hair of any length
Time Required: 4 minutes
Showcase that gorgeous natural volume! Double puffs are a timeless favorite for toddler girls, and adding satiny holiday ribbons makes them instantly photo-ready.
-
How to Style It:
-
Apply a generous layer of leave-in conditioner or curl cream to damp hair, focusing on the ends.
-
Part her hair down the middle into two high sections.
-
Use a soft bristle brush coated with a bit of child-safe styling gel to smooth the base of each section upward toward the top crown.
-
Secure loosely with silk or satin scrunchies which won’t snag or cause tension breakage, allowing her natural curls to fluff out freely into full, bouncy puffs.
-
Tie wide red and white satin ribbons over the scrunchies into oversized gift bows.
-
-
Tip: To get maximum puff volume without combing out definition, gently fluff the ends of the puffs using your fingers lightly coated with hair oil.
14. Flat-Twist Out with Glitter Gel
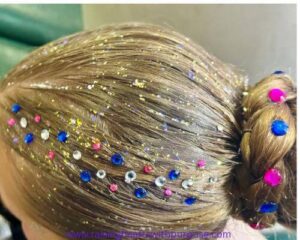
Best For: Short to medium curly or coily hair
Time Required: 8 minutes plus drying time
If you want soft, defined, head-turning curls for Christmas morning, a quick flat-twist out paired with a touch of kid-safe sparkle is the ultimate choice.
-
How to Style It:
-
On freshly washed, damp hair, apply a hydrating curl cream and divide the hair into 6–8 thick vertical sections.
-
Flat-twist each section loosely against the scalp down to the ends and secure the ends with mini flexi-rods or satin-covered clips.
-
Let her hair dry fully do this the night before while she sleeps in a satin bonnet.
-
In the morning, gently unravel the twists using oiled fingers to reveal lush, bouncy definition.
-
Lightly dab a child-safe, washable glitter hair gel onto the front roots or curl tips for a magical holiday shimmer.
-
-
Tip: Make sure to use non-toxic, aloe-based cosmetic hair glitter designed specifically for kids so it washes out effortlessly in her next bath.
15. Bubble Ponytail Mohawk
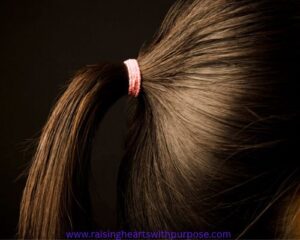
Best For: Medium to long curly or stretched hair
Time Required: 6 minutes
Fun, spunky, and full of personality! The bubble mohawk keeps hair controlled along the sides while letting a faux-hawk line of textured bubbles take center stage down the middle.
-
How to Style It:
-
Section the center of her hair from front hairline to the nape of her neck into a 2-to-3-inch wide strip like a mohawk track. Smooth the side sections flat using a light cream.
-
Divide that center strip into 3 to 4 smaller horizontal ponytails running down the middle of her head, securing each with a mini red or green elastic.
-
Take the first top ponytail and combine its length into the second ponytail down, pulling the hair slightly outward to fluff it into a bubble.
-
Continue connecting the ponytails down the line to complete the mohawk row.
-
-
Tip: Add small star or snowflake clips directly over each elastic base for an extra festive accent down the central line.
Category 4: Elegant & Formal For Holiday Dinners & Photos
Polished, timeless looks that perfectly complement holiday velvet dresses, fancy shoes, and annual family portraits.
When it’s time for formal Christmas dinners, church services, or professional holiday photo sessions, you want a hairstyle that looks sleek, sophisticated, and stays pristine all evening long. These five classic looks add an extra touch of magic and elegance without feeling too stiff or heavy for a toddler.
16. The Ballerina Bun with Tinsel
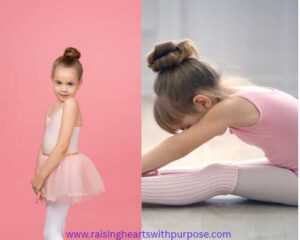
Best For: Medium to long hair
Time Required: 5–6 minutes
This sleek, graceful top knot is an absolute classic for formal wear. Adding a few subtle strands of metallic hair tinsel creates a fairy-like sparkle every time she catches the holiday light.
-
How to Style It:
-
Brush hair smooth using a soft bristle brush and a light mist of water or styling pomade to catch any stray baby hairs.
-
Gather hair into a neat, high ponytail at the crown and secure with an elastic.
-
Tie 2–3 strands of sparkly silver or gold hair tinsel around the base of the ponytail.
-
Twist the ponytail tightly incorporating the tinsel strands and wrap it around the base to form a neat donut shape.
-
Secure the bun with U-shaped hairpins or a hair donut sponge, letting the metallic threads peek through the twist.
-
-
Tip: Finish by wrapping a tiny pearl strand or a narrow red velvet ribbon around the base of the bun for a picture-perfect frame.
17. Waterfall Twist with Pearls
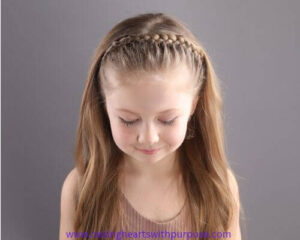
Best For: Straight, wavy, or shoulder-length hair
Time Required: 6 minutes
A waterfall twist creates a fairytale effect that looks incredibly intricate, but it is actually far easier than a traditional waterfall braid! Adding tiny pearl accents elevates it for formal celebrations.
-
How to Style It:
-
Take a 1-inch section of hair near the front hairline on one side and split it into two strands.
-
Twist the two strands over each other once.
-
Drop a small piece of hair from the top crown between the two twisted strands, letting it fall freely straight down this creates the cascading waterfall strand.
-
Twist your main two strands around each other again, pick up a new top strand, and drop it through.
-
Repeat along the side of her head and pin the twist securely behind her ear. Gently press mini adhesive stick-on hair pearls along the twist line.
-
-
Tip: If stick-on hair pearls aren’t available, use small clip-in pearl hair pins to keep the look secure while adding elegance.
18. The Holiday Halo Braid
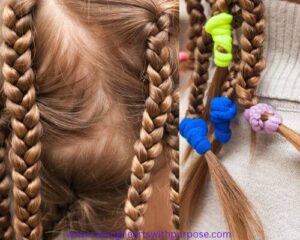
Best For: Medium to long hair
Time Required: 7 minutes
Frame her adorable face with a soft, romantic braid halo. This style keeps all hair off her neck and shoulders ideal for keeping her dress collar neat and tear-free throughout dinner.
-
How to Style It:
-
Create a soft side part, then start a simple Dutch braid or three-strand braid behind one ear.
-
Braid around the back nape of the neck, sweeping across to the opposite side while picking up small sections of hair along the lower hairline.
-
Once you reach the opposite temple, finish the remaining length in a regular braid.
-
Wrap the loose tail around the back along the initial braided path to complete the halo, tucking the ends under and securing with bobby pins.
-
-
Pro Tip: Gently pull at the outer edges of the braid pancake technique before tucking the ends away to make the halo look fuller and softer.
19. Soft Vintage Curls with a Velvet Headband
Best For: Short bobs, medium, or chin-length hair
Time Required: 5–7 minutes
Charming and nostalgic, this retro look gives off major Nutcracker vintage vibes! It’s ideal for toddlers with fine or shorter hair that might not fit into full updos.
-
How to Style It:
-
Dampen hair slightly or work with heatless foam curlers left in overnight. If using a curling wand on older toddlers, always use low heat and heat protectant spray.
-
Gently brush out the curls using a wide-tooth comb or paddle brush to create soft, uniform, vintage-style waves rather than tight ringlets.
-
Place a thick, padded velvet headband in deep crimson, emerald, or gold about an inch behind her front hairline.
-
Lightly mist with a kid-friendly flexible hold hairspray to keep flyaways down.
-
-
Pro Tip: Choose a headband with a soft fabric inner lining or elastic back so it stays comfortable without slipping during family dinner.
20. Side-Parted Hollywood Waves
Best For: Shoulder-length or long hair
Time Required: 6 minutes
Bring old Hollywood red-carpet glam to your holiday photos. Sweeping all her luscious waves over one shoulder creates an effortlessly posh look that highlights her sweet features.
-
How to Style It:
-
Create a clean, deep side part over the arch of her eyebrow.
-
Style loose, glossy waves through the mid-lengths and ends of her hair.
-
On the shallow side of the part the side with less hair, smooth the front section flat against her head, combing it back behind her ear.
-
Pin this side firmly behind her ear using an ornate jeweled or rhinestoned holiday bobby pin like a starburst or holly leaf pin.
-
Bring the rest of her cascading waves forward over the opposite shoulder.
-
-
Tip: Apply a tiny drop of lightweight hair oil to your palms and smooth over the finished waves to add instant mirror-like shine for flash photography.
Category 5: Playful & Whimsical Pure Toddler Joy
Cute, fun, and silly styles that toddlers actually get excited to wear bringing instant holiday cheer to everyday playtime.
Sometimes, holiday hair should just be about fun and imagination. These five whimsical styles draw inspiration from holiday characters, playful textures, and bright colors. They are designed to bring a big smile to your toddler’s face while keeping hair comfortable and secure.
21. The Grinch-Inspired High Sprout
Best For: Short to medium hair, or fine toddler hair
Time Required: 3 minutes
Inspired by Cindy Lou Who and the residents of Whoville, this iconic high sprout is ultra-playful, hilarious in pictures, and guaranteed to make your little one giggle every time she sees herself in the mirror.
-
How to Style It:
-
Spritz her hair with a little water or leave-in conditioner to smooth out any bedtime bedhead.
-
Brush all her hair straight up toward the exact center crown of her head.
-
Secure tightly into a single high ponytail using a bright green or red elastic.
-
Gently tease the ponytail hair slightly or use a tiny bit of kid-friendly gel to make the ponytail stick straight up or fan out like a palm tree.
-
Slide a fluffy green pom-pom clip or a tiny Santa hat clip right at the base of the sprout.
-
-
Tip: If her hair is very long and flops over, thread a soft, bendable green pipe cleaner through the hair tie and wrap the hair around it so it stays pointing straight up into the air.
22. Multi-Colored Mini Elastics Rainbow
Best For: Any hair length with bangs or front strands
Time Required: 5 minutes
If your toddler loves bright colors and gets excited choosing her own accessories, this style lets her show off a row of festive red, green, and white elastics right across the front hairline.
-
How to Style It:
-
Create a clean side part on her hair.
-
Starting near the front temple on the heavier side, take a small 1-inch square section of hair along the hairline and tie it with a red elastic.
-
Move back an inch, gather a second small section along with the tail of the first ponytail, and secure it with a green elastic.
-
Repeat this process 3–4 times moving backward along her head, alternating between red, green, and clear elastics to form a smooth candy cane chain.
-
Leave the rest of her hair loose, curly, or in a simple low pony.
-
-
Pro Tip: Let her pick out the elastic color order herself while you style, giving her a choice keeps her engaged and sitting still.
23. Pompom Pigtails
Best For: Medium to long hair
Time Required: 4 minutes
Crafting meets hairstyling! Soft, fuzzy craft pom-poms add incredible texture, bright holiday color, and a cozy winter feel to standard pigtails.
-
How to Style It:
-
Part her hair down the center into two high or low pigtails and secure with mini elastics.
-
Take pom-pom hair elastics or glue mini craft pom-poms directly onto alligator hair clips using non-toxic craft glue beforehand.
-
Wrap or clip 2–3 colorful pom-poms down the length of each pigtail at even intervals.
-
Fluff out the sections of hair between each pom-pom so they look like soft, snowy clusters.
-
-
Pro Tip: Choose snowy white, deep green, and candy red pom-poms for an instant winter-wonderland vibe.
24. Silly Side Buns Space Buns
Best For: Medium to long hair
Time Required: 4–5 minutes
Space buns are a toddler favorite year-round, but wrapping them in metallic tinsel or velvet scrunchies instantly turns them into festive holiday ornaments on top of her head.
-
How to Style It:
-
Divide her hair down the middle into two high pigtails right on the top sides of her head.
-
Twist each pigtail around its base to create two messy, playful mini buns.
-
Secure each bun with an elastic, then slip a shiny tinsel scrunchie or metallic gold hair tie over each one.
-
Pull out a few soft strands near her ears to keep the look effortless and cute.
-
-
Pro Tip: Don’t worry about making these buns perfect or symmetrical, the messier and bouncier they are, the cuter they look.
25. The Present Box Bow Grid
Best For: Short to medium hair
Time Required: 6 minutes
Turn the top of her head into a beautifully wrapped Christmas gift! This grid pattern creates the illusion of ribbon wrapped across a present, complete with a bow topper.
-
How to Style It:
-
Divide the front top section of her hair into a 2×2 grid four equal square sections.
-
Secure the front two sections with mini clear elastics.
-
Cross the tail of the front-left section over to join the back-right section, and the front-right section over to join the back-left section forming a criss-cross ribbon shape.
-
Join all four tails together at the crown into one central half-up ponytail.
-
Clip an oversized satin bow right in the center where all the strands meet just like a gift bow on a Christmas present.
-
-
Pro Tip: Use red or green ribbon-covered elastics for the front grid lines to make the gift box effect pop even more.
7. Parent’s Survival Guide: Pro-Tips for Toddler Holiday Hair
Before you grab your comb and hair ties, keep these practical tips in mind to ensure styling time stays tear-free and fun for both of you:
-
Prioritize Comfort Over Perfection: Never pull elastics too tightly around delicate edges or scalps. If your toddler starts tugging at a style or complaining, loosen it up or swap to a soft headband instead.
-
Use the Right Tools: Keep a stash of silicone-friendly detangling spray, a soft bristle brush, satin scrunchies, and a pair of painless elastic safety cutters which slide under rubber bands and snip them safely without cutting hair.
-
The Power of Distraction: Keep a holiday styling kit ready with her favorite Christmas book, a tablet with a holiday show, or a small festive treat like a gingerbread cookie or a cup of warm cocoa to keep her little hands busy while you style.
Conclusion
Wrap Up: Embrace the Holiday Magic and the Mess
At the end of the day, holiday memories aren’t built on perfectly placed hairs or flawless bows, they’re made in the messy, joyful moments in between. Toddlers are naturally active, curious, and constantly on the move, which means that even the sleekest ballerina bun or neatest braid halo might turn into a delightfully wind-blown topknot halfway through opening presents. And you know what? That is completely okay.
Messy hair, crooked bows, and wind-swept curls are all part of the sweet charm of the toddler years. So take a deep breath, don’t stress over perfection, and focus on enjoying the holiday magic through your little girl’s eyes. As long as she feels comfortable and happy, her holiday look is a total success.
Love these holiday hair ideas? Don’t forget to pin this post to your favorite Christmas or Toddler Style board on Pinterest so you can easily find it when you’re getting ready on Christmas morning. Happy Holidays and happy styling.